Connect a Coding Agent
Version: 1.1 | Last updated: 2026-10-02
Bluebox's MCP server puts your production environment inside your coding agent, so you can ask questions, browse investigations, and explore connected services without leaving your editor.
Capabilities
Once connected, your agent can:
- Ask natural language questions about your live production environment and get evidence-backed answers.
- Read past investigations, including their findings and summaries.
- Explore the services and repositories connected to your workspace.
- Follow up on a previous answer within the same conversation thread.
Before you start
Bluebox authenticates MCP clients with an access token sent as a bearer header. Your agent must support MCP over HTTP with custom request headers. Clients that only support stdio transport, or that run in sandboxed environments that block custom headers, cannot connect.
Every client below uses the same connection values:
| Setting | Value |
|---|---|
| Server URL | https://app.bluebox.ai/v1/mcp |
| Transport | Streamable HTTP |
Authorization header | Bearer <your-token> |
X-Workspace-Id header | Optional. See Scope to a specific workspace. |
Create an access token
Go to Settings → Access tokens and select Create token. Pick your agent and the page generates a ready-to-paste config with your token already filled in.
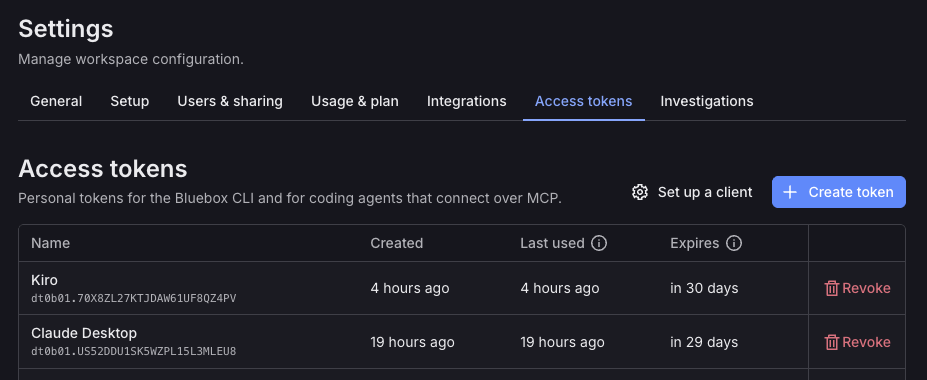
Create a dedicated token for each agent rather than reusing one. That way you can revoke one agent's access without affecting the others. Bluebox shows the token value once, at creation, so copy it somewhere safe before leaving the page.
A token has three parts separated by dots (.). The UI shows the first two so you can tell tokens apart. The token carries your full Bluebox identity, so anyone with a copy can call the whole API as you, including questions that count against your workspace's usage. If a token or config file is exposed, revoke the token right away in Settings → Access tokens.
Set up your agent
Each section below follows the same steps: add the server, restart or reload the agent, and confirm the connection. Replace <your-token> with the token you just created. The setup page generates a config for many popular clients.
Claude Code
Claude Code registers MCP servers from the command line. See Connect Claude Code to tools via MCP for the full reference.
-
Run the command from the setup page:
claude mcp add --transport http bluebox https://app.bluebox.ai/v1/mcp -H "Authorization: Bearer <your-token>"This registers Bluebox for the current project only (Claude Code's default
localscope). To use Bluebox in every project, add--scope userto the command. Avoid--scope project, which writes the token to a.mcp.jsonfile meant to be shared with your team. -
Start a new Claude Code session.
-
Run
claude mcp listand confirmblueboxshows✔ Connected. Inside a session,/mcpshows the same status.
Claude Desktop
Claude Desktop adds remote servers as custom connectors through a form. See Get started with custom connectors using remote MCP for the full reference.
-
Open Customize → Connectors and select Add custom connector.
-
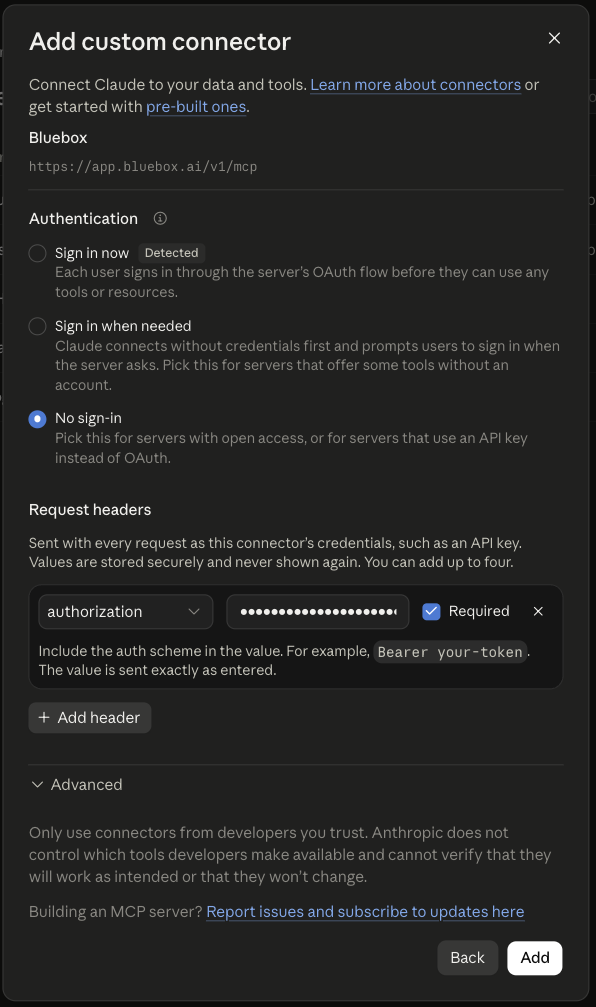
Fill in the form:
- Name:
Bluebox - MCP server URL:
https://app.bluebox.ai/v1/mcp - Authentication: No sign-in
- Request headers: add
authorizationwith the valueBearer <your-token>
- Name:
-
Select Add.
-
In a new chat, open the + menu, select Connectors, and confirm Bluebox is turned on.
Claude Desktop does not let you edit request headers after the connector is added. To rotate the token, remove the connector and add it again.
Visual Studio Code
Visual Studio Code stores MCP servers in your user-profile mcp.json. See Use MCP servers in VS Code for the full reference.
-
Run MCP: Open User Configuration from the Command Palette.
-
Merge this block into the file:
{"servers": {"bluebox": {"type": "http","url": "https://app.bluebox.ai/v1/mcp","headers": {"Authorization": "Bearer <your-token>"}}}}VS Code uses
serversas the top-level key and requires"type": "http". Keep the config in your user profile rather than.vscode/mcp.json, since workspace files are usually committed and this one carries your token. -
Save the file.
-
Run MCP: List Servers and confirm
blueboxis running.
Cursor
Cursor reads MCP servers from mcp.json. See Model Context Protocol (MCP) for the full reference.
-
Open
~/.cursor/mcp.json. Keep the config in your user directory rather than a project's.cursor/mcp.json, since project files are usually committed and this one carries your token. -
Merge this block into the file:
{"mcpServers": {"bluebox": {"url": "https://app.bluebox.ai/v1/mcp","headers": {"Authorization": "Bearer <your-token>"}}}} -
Save the file and restart Cursor.
-
Open Cursor's MCP settings and confirm
blueboxis enabled with its tools listed.
Kiro
Kiro reads MCP servers from mcp.json. See MCP configuration for the full reference.
-
Open
~/.kiro/settings/mcp.json. Edit the file directly, since Kiro'smcp addcommand cannot set request headers. -
Merge this block into the file:
{"mcpServers": {"bluebox": {"url": "https://app.bluebox.ai/v1/mcp","headers": {"Authorization": "Bearer <your-token>"}}}} -
Save the file.
-
Open the MCP Servers tab in the Kiro panel and confirm
blueboxis connected.
Kiro web
Kiro web runs its agent in a cloud sandbox, so the sandbox needs network access to Bluebox and the token lives in a sandbox secret instead of a local file. See MCP servers and Secrets for the full reference.
-
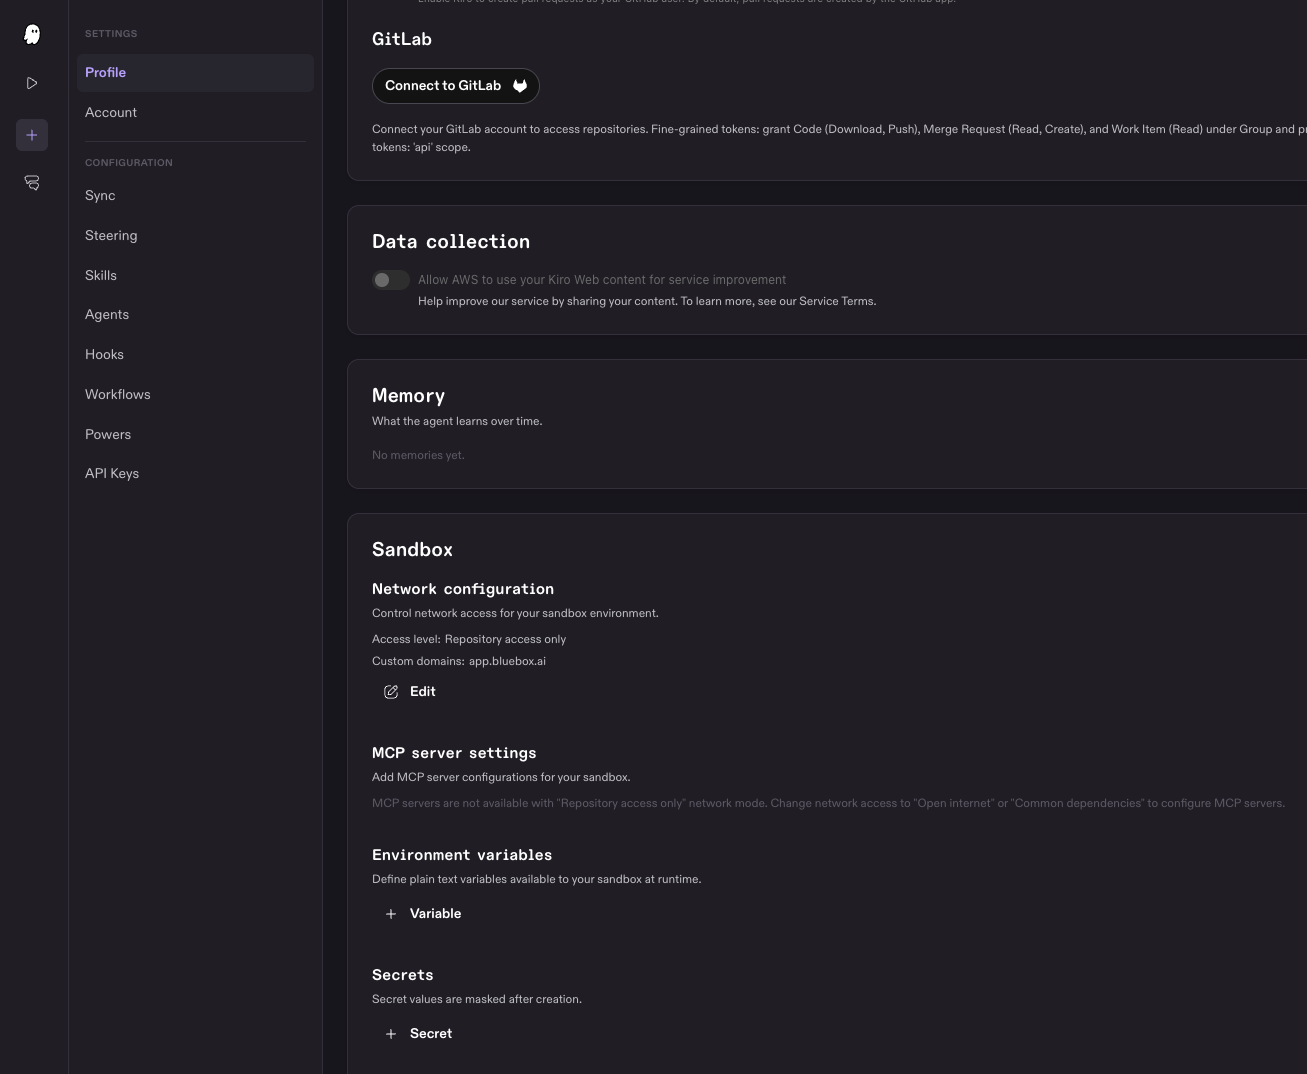
Open Settings → Profile and scroll to the Sandbox section.
-
Under Network configuration, select Edit. Set Access level to Common dependencies, add
app.bluebox.aito Custom allowed domains, and select Save. MCP servers are not available in Repository access only mode.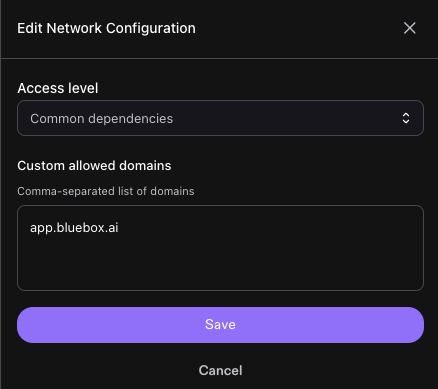
-
Under Secrets, select Secret. Enter
BLUEBOX_TOKENas the Secret name, paste your token as the Secret value, and select Save.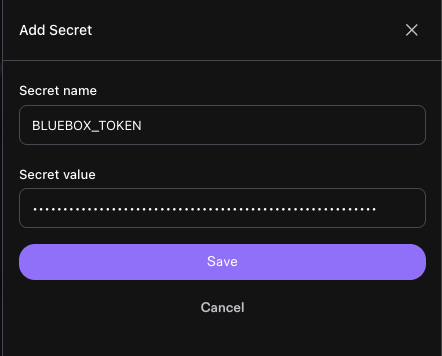
-
Under MCP server settings, select Add server. On the Paste JSON tab, paste this config and select Save:
{"mcpServers": {"bluebox": {"url": "https://app.bluebox.ai/v1/mcp","headers": {"Authorization": "Bearer ${BLUEBOX_TOKEN}"}}}}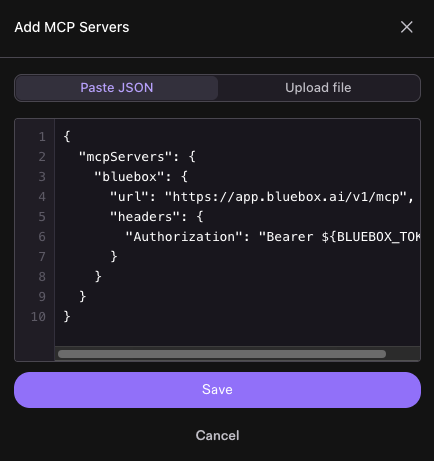
-
Confirm the Sandbox section lists
app.bluebox.aiunder custom domains,blueboxas an HTTP server, andBLUEBOX_TOKENunder Secrets. The settings apply to the next sandbox you start.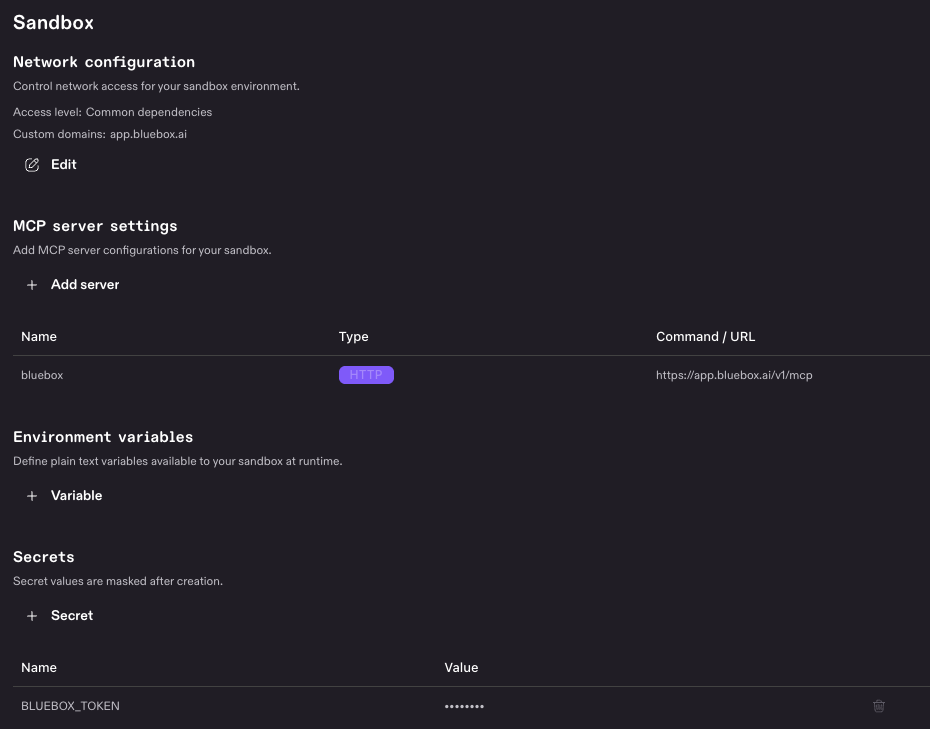
Codex
Codex reads MCP servers from config.toml, shared by the Codex CLI, IDE extension, and desktop app. See Model Context Protocol for the full reference.
-
Open
~/.codex/config.toml, or.codex/config.tomlin a trusted project's root. -
Add this section:
[mcp_servers.bluebox]url = "https://app.bluebox.ai/v1/mcp"bearer_token_env_var = "BLUEBOX_TOKEN" -
Export your token in your shell, and add the same line to your shell profile (
~/.zshrc,~/.bashrc, or equivalent) to make it permanent:export BLUEBOX_TOKEN="<your-token>" -
Start a new Codex session and run
/mcpto confirmblueboxis listed.
Any other MCP client
Most MCP clients accept a config in this shape. Check your client's documentation for where the file lives and whether it expects mcpServers or servers as the top-level key.
-
Merge this block into your client's MCP config:
{"mcpServers": {"bluebox": {"type": "http","url": "https://app.bluebox.ai/v1/mcp","headers": {"Authorization": "Bearer <your-token>"}}}} -
Restart or reload your client.
-
Ask the agent a question about your production environment to confirm the connection.
Scope to a specific workspace
By default, Bluebox resolves your workspace automatically: first your preferred workspace, then the one you used most recently, then your only workspace if you belong to just one.
To pin a connection to one workspace, send an X-Workspace-Id header with your workspace ID. Workspace IDs start with ws_ and appear in the URL when you are signed in to Bluebox. The setup page adds the header for you when you select a workspace before copying the config. To add it by hand:
| Client | Where to add it |
|---|---|
| Claude Code | Append -H "X-Workspace-Id: <your-workspace-id>" to the claude mcp add command. |
| Claude Desktop | Add a custom request header named X-Workspace-Id when you create the connector. |
| VS Code, Cursor, Kiro, Kiro web, other clients | Add "X-Workspace-Id": "<your-workspace-id>" to the headers object. |
| Codex | Add http_headers = { "X-Workspace-Id" = "<your-workspace-id>" } to the [mcp_servers.bluebox] section. |
A workspace you are not a member of is always refused, whether it was set in your config or mentioned in a question.
Troubleshooting
Bluebox tools do not appear after setup. Restart or reload your agent fully. If the tools still do not appear, verify the endpoint URL and token are correct, and confirm your client is up to date. Bluebox requires a client that supports the MCP HTTP transport; older client versions may need an update before they can connect. Check Settings → Access tokens to confirm the token exists and has not been revoked.
The agent is using the wrong workspace.
Your connection is not pinned to a workspace. Re-generate the config from the setup page with your target workspace selected, or add X-Workspace-Id to your config manually, then restart your agent.
"Several workspaces available" error.
Your account belongs to more than one workspace and no default is set. Pin the connection to one workspace using X-Workspace-Id, or set a preferred workspace in your Bluebox profile settings.
An answer takes a long time or shows "still running." Some questions take longer than a minute to complete. Your agent will poll for the result automatically. Do not ask the same question in the same session while one is in progress; doing so starts a second independent run. Wait for the first answer to arrive, then continue with follow-up questions.
Token is invalid or access is denied. Your token may have been revoked or expired. Go to Settings → Access tokens, revoke the old token, and generate a new one. Update your agent's config with the new token and restart.