Connect a Coding Agent
Version: 5.2 | Last updated: 2026-11-12
Bluebox's MCP server puts your production environment inside your coding agent, so you can ask questions, browse investigations, and explore connected services without leaving your editor.
Capabilities
Once connected, your agent can:
- Ask natural language questions about your live production environment and get evidence-backed answers.
- Read past investigations, including their findings and summaries. Your agent reads investigations with your access, including investigations shared with the workspace, and cannot change them.
- Explore the services and repositories connected to your workspace.
- Follow up on a previous answer within the same conversation thread. A follow-up keeps the service and time window of the earlier question unless your agent names new ones.
The Bluebox skills use the MCP server when your agent has it connected, so they work without the Bluebox CLI. Without the server they use the CLI. CI gates and hook scripts always need the CLI.
Before you start
Agents that support MCP sign-in connect with the Bluebox server URL alone. The agent opens your browser and you approve access, so you don't create or paste a token. Other agents connect with an access token sent as a bearer header.
Either way, your agent must support MCP over HTTP. Clients that only support stdio transport cannot connect. To use an access token, the agent must also support custom request headers.
Every client below uses the same connection values:
| Setting | Value |
|---|---|
| Server URL | https://app.bluebox.ai/v1/mcp |
| Transport | Streamable HTTP |
Authorization header | Only with an access token: Bearer <your-token>. Leave it out when you sign in. |
X-Workspace-Id header | Optional. See Scope to a specific workspace. |
Connect your agent
Each agent below has two ways to connect. Sign in when your agent supports MCP sign-in. Use an access token when it does not, or when it runs where a browser cannot open, such as a cloud sandbox.
To sign in, add the server URL with no Authorization header, then approve access in your browser the first time the agent connects. To pin a workspace, keep the X-Workspace-Id header. See Scope to a specific workspace.
To use an access token, create one first, then replace <your-token> in the config with it.
You can also open your profile menu, select Account, then open Connected agents and select Connect an agent. The dialog gives short setup steps with your server URL filled in.
A sign-in connection ends 90 days after you approve it, or after 14 days without use, and then you approve the agent again. See Review and revoke connected agents.
Claude Code
Sign in
-
Run:
claude mcp add --transport http bluebox https://app.bluebox.ai/v1/mcpThis registers Bluebox for the current project only. To use Bluebox in every project, add
--scope user. -
Start a Claude Code session and run
/mcp. Selectbluebox, then Authenticate. -
Approve access in the browser page that opens.
/mcpthen showsblueboxas connected.The page shows "Runs on this computer" and a warning that another program could have made the request. This is expected when you just started the sign-in. See What the approval page shows.
Use an access token
Claude Code registers MCP servers from the command line. See Connect Claude Code to tools via MCP for the full reference.
-
Run the command from the setup page:
claude mcp add --transport http bluebox https://app.bluebox.ai/v1/mcp -H "Authorization: Bearer <your-token>"This registers Bluebox for the current project only (Claude Code's default
localscope). To use Bluebox in every project, add--scope userto the command. Avoid--scope project, which writes the token to a.mcp.jsonfile meant to be shared with your team. -
Start a new Claude Code session.
-
Run
claude mcp listand confirmblueboxshows✔ Connected. Inside a session,/mcpshows the same status.
Claude Desktop
Sign in
-
Open Customize → Connectors and select Add custom connector.
-
Enter
Blueboxas the Name andhttps://app.bluebox.ai/v1/mcpas the MCP server URL. Do not choose No sign-in for Authentication. Add noAuthorizationheader. -
Select Add, then select Connect on the connector and approve access in the browser page that opens.
Bluebox recognizes Claude Desktop, so the page shows a certified icon and no warning.
Use an access token
Claude Desktop adds remote servers as custom connectors through a form. See Get started with custom connectors using remote MCP for the full reference.
-
Open Customize → Connectors and select Add custom connector.
-
Fill in the form:
- Name:
Bluebox - MCP server URL:
https://app.bluebox.ai/v1/mcp - Authentication: No sign-in
- Request headers: add
authorizationwith the valueBearer <your-token>
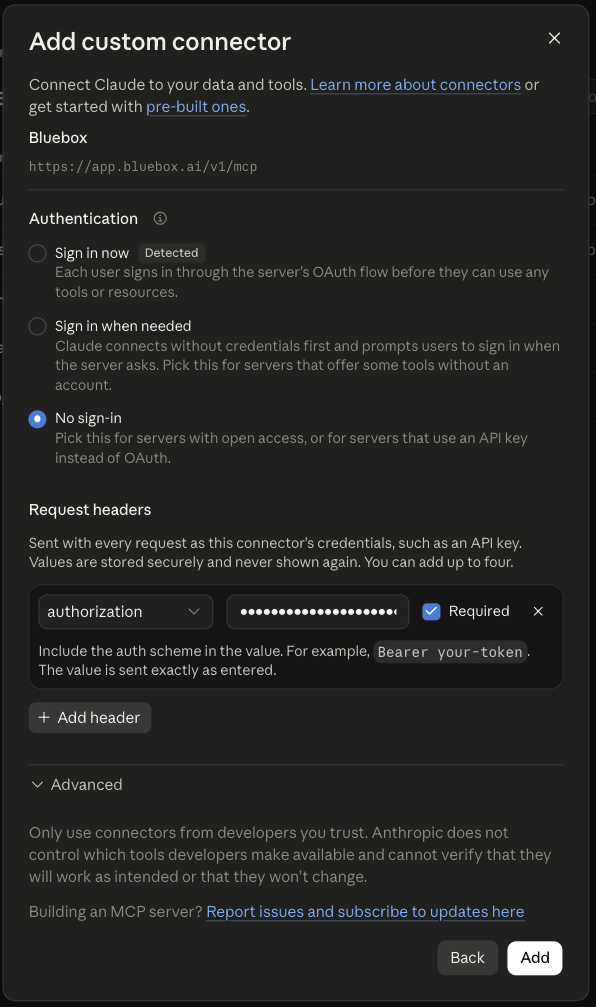
- Name:
-
Select Add.
-
In a new chat, open the + menu, select Connectors, and confirm Bluebox is turned on.
Claude Desktop does not let you edit request headers after the connector is added. To rotate the token, remove the connector and add it again.
Visual Studio Code
Sign in
-
Run MCP: Open User Configuration from the Command Palette.
-
Merge this block into the file:
{"servers": {"bluebox": {"type": "http","url": "https://app.bluebox.ai/v1/mcp"}}} -
Save the file. When VS Code asks you to authenticate
bluebox, approve the request and complete the sign-in in your browser. -
Run MCP: List Servers and confirm
blueboxis running.The approval page names Microsoft as the publisher. It shows either "Runs on this computer" with a warning that another program could have made the request, or "Authorizes for vscode.dev". Both are expected when you just started the sign-in. A VS Code build from another publisher shows "Unverified app" with no publisher host.
Use an access token
Visual Studio Code stores MCP servers in your user-profile mcp.json. See Use MCP servers in VS Code for the full reference.
-
Run MCP: Open User Configuration from the Command Palette.
-
Merge this block into the file:
{"servers": {"bluebox": {"type": "http","url": "https://app.bluebox.ai/v1/mcp","headers": {"Authorization": "Bearer <your-token>"}}}}VS Code uses
serversas the top-level key and requires"type": "http". Keep the config in your user profile rather than.vscode/mcp.json, since workspace files are usually committed and this one carries your token. -
Save the file.
-
Run MCP: List Servers and confirm
blueboxis running.
Cursor
Sign in
-
Open the Command Palette, run Open MCPs, and select New MCP Server. Cursor opens
mcp.json. -
Merge this block into the file:
{"mcpServers": {"bluebox": {"url": "https://app.bluebox.ai/v1/mcp"}}} -
Save the file.
blueboxappears in Cursor's MCP settings. Select Connect next to it, and approve access in the browser page that opens.The approval page shows an "Unverified app" warning with no publisher host, because Cursor registers itself with Bluebox. It also shows "Authorizes for www.cursor.com", the address the sign-in returns to. This is expected when you just started the sign-in. Approve only if you did.
Use an access token
Cursor reads MCP servers from mcp.json. See Model Context Protocol (MCP) for the full reference.
-
Open
~/.cursor/mcp.json. Keep the config in your user directory rather than a project's.cursor/mcp.json, since project files are usually committed and this one carries your token. -
Merge this block into the file:
{"mcpServers": {"bluebox": {"url": "https://app.bluebox.ai/v1/mcp","headers": {"Authorization": "Bearer <your-token>"}}}} -
Save the file and restart Cursor.
-
Open Cursor's MCP settings and confirm
blueboxis enabled with its tools listed.Cursor can open a Bluebox sign-in page in your browser even though the config holds a token. You can close the page, or move to sign-in so it stops.
Kiro
Sign in
-
Open
~/.kiro/settings/mcp.json, or.kiro/settings/mcp.jsonin a project's root to connect for one project. Edit the file directly. -
Merge this block into the file:
{"mcpServers": {"bluebox": {"url": "https://app.bluebox.ai/v1/mcp"}}} -
Save the file and approve access in the browser page that opens.
-
Open the MCP Servers tab in the Kiro panel and confirm
blueboxis connected.
Use an access token
Kiro reads MCP servers from mcp.json. See MCP configuration for the full reference.
-
Open
~/.kiro/settings/mcp.json. Edit the file directly, since Kiro'smcp addcommand cannot set request headers. -
Merge this block into the file:
{"mcpServers": {"bluebox": {"url": "https://app.bluebox.ai/v1/mcp","headers": {"Authorization": "Bearer <your-token>"}}}} -
Save the file.
-
Open the MCP Servers tab in the Kiro panel and confirm
blueboxis connected.
Kiro web
Kiro web connects with an access token.
Kiro web runs its agent in a cloud sandbox, so the sandbox needs network access to Bluebox and the token lives in a sandbox secret instead of a local file. See MCP servers and Secrets for the full reference.
-
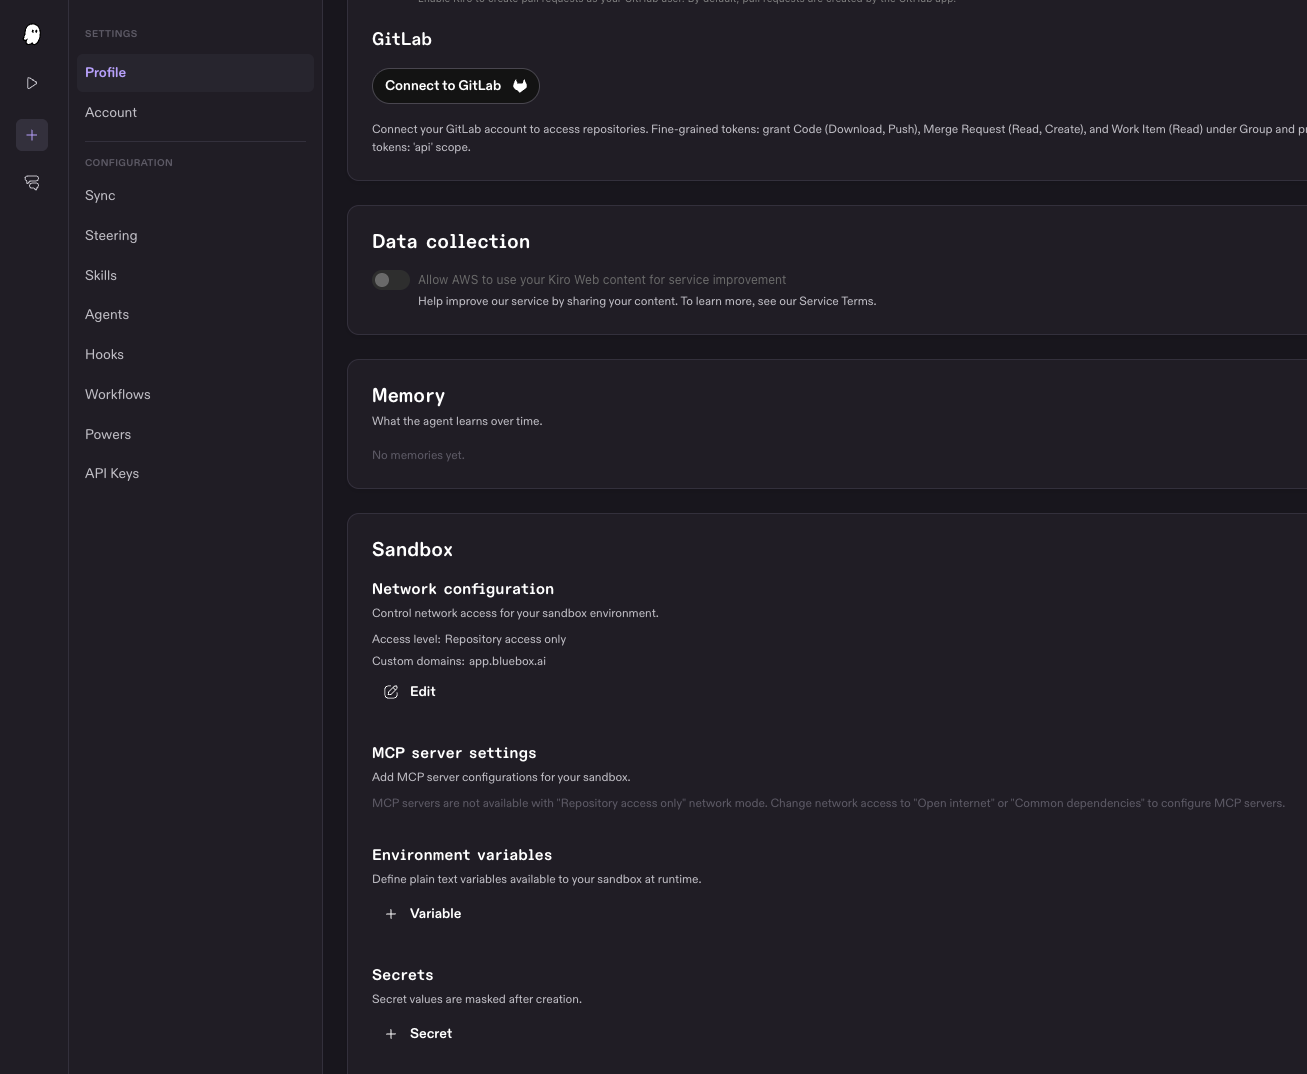
Open Settings → Profile and scroll to the Sandbox section.
-
Under Network configuration, select Edit. Set Access level to Common dependencies, add
app.bluebox.aito Custom allowed domains, and select Save. MCP servers are not available in Repository access only mode.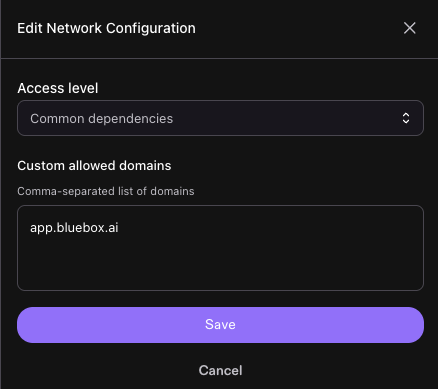
-
Under Secrets, select Secret. Enter
BLUEBOX_TOKENas the Secret name, paste your token as the Secret value, and select Save.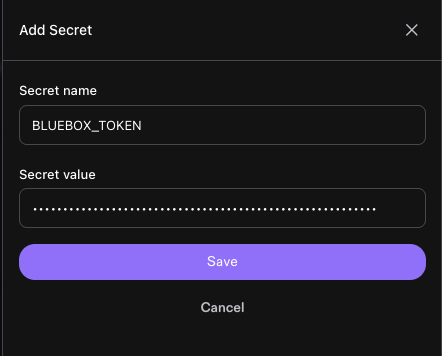
-
Under MCP server settings, select Add server. On the Paste JSON tab, paste this config and select Save:
{"mcpServers": {"bluebox": {"url": "https://app.bluebox.ai/v1/mcp","headers": {"Authorization": "Bearer ${BLUEBOX_TOKEN}"}}}}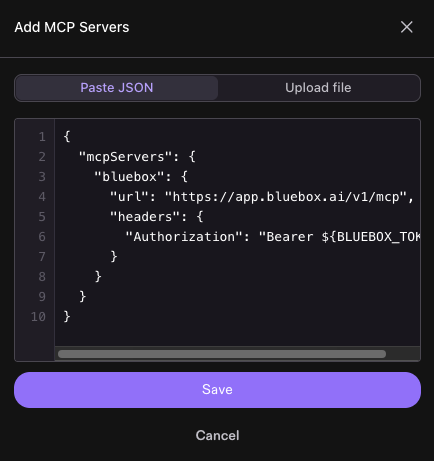
-
Confirm the Sandbox section lists
app.bluebox.aiunder custom domains,blueboxas an HTTP server, andBLUEBOX_TOKENunder Secrets. The settings apply to the next sandbox you start.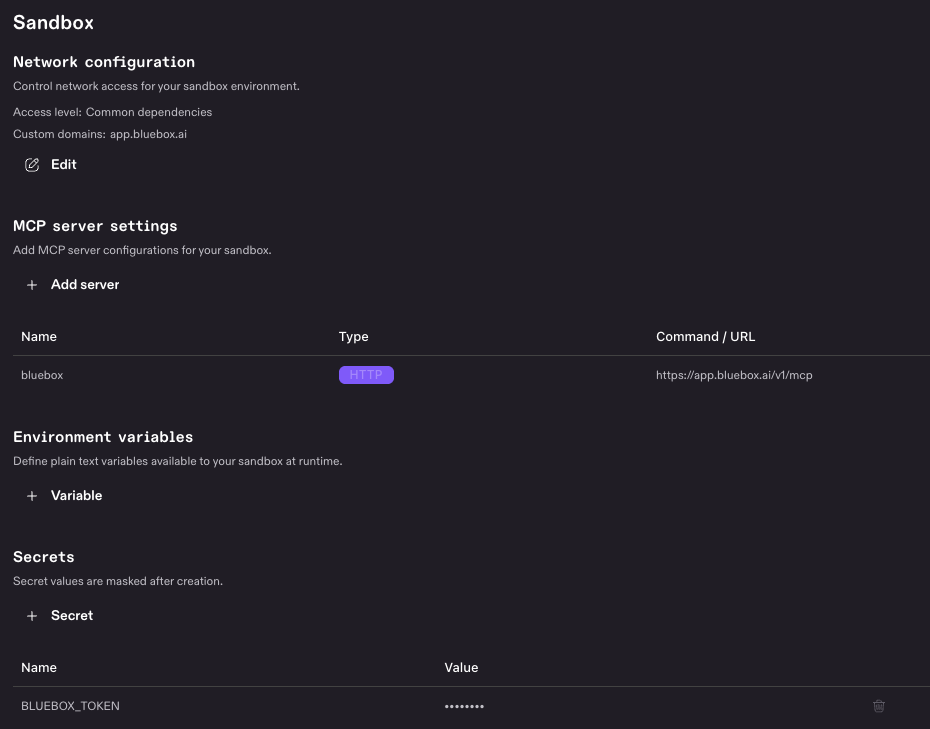
Codex
Sign in
Sign-in needs Codex 0.148.0 or later. Older releases stop with "Authorization server response missing required issuer". Run codex --version to check your version.
-
Add the server with this command, which writes the
config.tomlsection below and starts sign-in:codex mcp add --url https://app.bluebox.ai/v1/mcp blueboxOr add the section to
~/.codex/config.tomlyourself, then runcodex mcp login blueboxto start sign-in:[mcp_servers.bluebox]url = "https://app.bluebox.ai/v1/mcp" -
Approve access in the browser page that opens, then run
/mcpin a Codex session to confirmblueboxis listed.The page shows "Published by chatgpt.com" and "Runs on this computer" with a warning that another program could have made the request. This is expected when you just started the sign-in.
Use an access token
Codex reads MCP servers from config.toml, shared by the Codex CLI, IDE extension, and desktop app. See Model Context Protocol for the full reference.
-
Open
~/.codex/config.toml, or.codex/config.tomlin a trusted project's root. -
Add this section:
[mcp_servers.bluebox]url = "https://app.bluebox.ai/v1/mcp"bearer_token_env_var = "BLUEBOX_TOKEN" -
Export your token in your shell, and add the same line to your shell profile (
~/.zshrc,~/.bashrc, or equivalent) to make it permanent:export BLUEBOX_TOKEN="<your-token>" -
Start a new Codex session and run
/mcpto confirmblueboxis listed.
Any other MCP client
Sign in
If your client supports MCP sign-in, add only the server URL. Check your client's documentation for where its MCP config lives and how it starts sign-in. If it does not support sign-in, use an access token.
Use an access token
Most MCP clients accept a config in this shape. Check your client's documentation for where the file lives and whether it expects mcpServers or servers as the top-level key.
-
Merge this block into your client's MCP config:
{"mcpServers": {"bluebox": {"type": "http","url": "https://app.bluebox.ai/v1/mcp","headers": {"Authorization": "Bearer <your-token>"}}}} -
Restart or reload your client.
-
Ask the agent a question about your production environment to confirm the connection.
Ask your first question
The first time you sign in to Bluebox, from your agent or in the browser, Bluebox creates a workspace for you. Before Bluebox can answer, that workspace needs an observability backend connection. Bluebox starts preparing one when it has the information it needs. See The observability backend connection.
Until the connection is ready, list_services lists no services and ask replies that the workspace has no connected observability backend yet. Both give a link to the Bluebox web app. Open Settings → Setup there to follow the setup, or to connect a backend yourself. Then ask again.
If you have no workspace
You can be signed in with no workspace, for example after a workspace owner removed you, or when you signed in from an invitation you have not accepted. A Bluebox tool called without a workspace, on a connection with no X-Workspace-Id header, then replies "you have no Bluebox workspace yet" with a link to the Bluebox web app. list_workspaces returns an empty list with the same next step. A call that names a workspace you no longer belong to fails with "workspace not found or access denied" instead.
- Open the link and sign in. Bluebox offers to create your own workspace. To join a teammate's workspace instead, open the invitation link a workspace owner sent you and accept it.
- In the workspace, open Settings → Setup and connect an observability backend.
- Ask your question again. Your agent uses the new workspace on its next call, so you do not reconnect the agent or sign in again.
Keep working while a question runs
If your agent supports MCP background tasks, as the Claude Code terminal does, every question runs in the background. Keep working while Bluebox investigates; the answer appears in your conversation when it's ready.
To stop a question in Claude Code, run /tasks and stop the task. Bluebox stops the investigation too, so it stops counting toward your usage. Usage already spent stays counted. Only you, or an owner of your workspace, can stop your question. Members you share the conversation with can read it but can't stop it.
Other agents wait for the answer. If it isn't ready in time, the agent gets a "still running" result and fetches the answer with get_ask_result. An agent that stops waiting or disconnects doesn't stop the investigation.
Create an access token
Open your profile menu, select Account, then open Access tokens and select Create token. Pick your agent and the page generates a ready-to-paste config with your token already filled in.
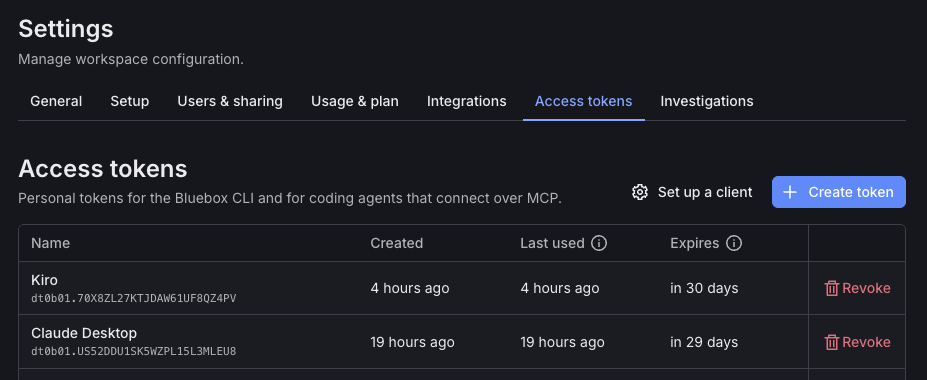
Create a dedicated token for each agent rather than reusing one. That way you can revoke one agent's access without affecting the others. Bluebox shows the token value once, at creation, so copy it somewhere safe before leaving the page.
A token has three parts separated by dots (.). The UI shows the first two so you can tell tokens apart. The token carries your full Bluebox identity, so anyone with a copy can call the whole API as you, including questions that count against your workspace's usage. If a token or config file is exposed, revoke the token right away in Account → Access tokens.
Know what you approve when you sign in
The first time an agent connects without a token, it opens your browser so you can sign in to Bluebox and approve access.
- Access tokens keep working, but sign-in is recommended. See Move from an access token to sign-in.
- Sign-in grants the
mcp:toolspermission, which lets the agent call Bluebox tools in your workspaces as you. - If a tool needs a permission your sign-in does not include, the agent is told which one is missing and asks you to approve it.
- A sign-in works only at the MCP server. It cannot call the rest of the Bluebox API.
- The
X-Workspace-Idheader works the same way as with a token. See Scope to a specific workspace. - Review and revoke the agents you approved in Account → Connected agents. See Review and revoke connected agents.
What the approval page shows
Before your agent receives access, Bluebox shows an approval page. It names the app, says who publishes it, and lists what the app will be able to do. Read it before you choose Approve.
The app name is the name the app gives itself, so Bluebox cannot vouch for it on its own. The publisher host is the web address that hosts the app's public description. Check it against the app you meant to connect.
The page tells you two separate things.
Where the sign-in returns to:
- "Runs on this computer". The app listens for the sign-in on your own machine. The page warns that another program on your computer could have made this request. Approve only if you just started the sign-in from your agent.
- "Authorizes for" a host. The sign-in returns to that web address, such as a relay run by the app's publisher. Check that the host is the one you expect.
How well Bluebox knows the app:
- A certified icon beside the app name. Bluebox recognizes the publisher and the sign-in returns to the publisher's own site. No warning appears.
- A publisher host, with no "Unverified app" warning. Bluebox recognizes the publisher, but the sign-in does not return to the publisher's own site.
- An "Unverified app" warning, with the publisher host in bold. Bluebox does not recognize the publisher. Approve only if you started this sign-in and you trust the host shown.
- An "Unverified app" warning with no publisher host. The app registered itself with Bluebox. Approve only if you started this sign-in and you trust the app.
The two can combine. An app that registered itself and runs on your computer shows "Unverified app" and "Runs on this computer" together.
You can also give the connection a name. Choose Deny to refuse. The agent receives no access.
If sign-in does not start
Instead of the approval page, your browser can show a page titled "Cannot sign in". Bluebox never shows the app's address on that page. Find your message below.
| Message | What to do |
|---|---|
| "This app declares a client authentication method that Bluebox does not accept for public clients." | Update the app, or ask its publisher to fix its public description. Use an access token until then. |
| "This app's client metadata document is missing or invalid." | Ask the app's publisher to fix it, or update the app. Use an access token until then. |
| "Bluebox could not reach the host that publishes this app's client metadata document." | Wait a minute and start the sign-in again. If it keeps failing, use an access token. |
| "Too many requests to load this app's client metadata document." | Wait a few minutes and start the sign-in again. If it keeps failing, use an access token. |
| "Too many sign-in attempts." | Wait a few minutes and start the sign-in again. |
| "The redirect address in the sign-in link does not match the app's registration." | Update the app, then start the sign-in again from it. |
| "The app that sent you here is not registered or has been disabled." | Update the app. If the message stays, sign-in is turned off for your deployment or the app is blocked. Use an access token. |
| "Sign-in is temporarily unavailable." | Try again later. |
If the approval page says the request "has expired or is invalid", start the sign-in again from your agent.
Review and revoke connected agents
Each agent you approve through MCP sign-in appears as one row on the Connected agents tab. Open your profile menu, select Account, then open Connected agents. The Account page also holds your Access tokens and Browser sessions.
Each row shows:
- The agent's name, the host that published it when known, and a trust label: Verified, Known publisher, Unverified, or Self-registered.
- The connection name you entered when you approved the agent, if you entered one.
- When the connection was created and when the agent last used it. Last used shows Never until the agent makes its first call, and can lag the latest call by up to five minutes.
- When the connection expires. Hover over a date to see the exact time.
- The operating system of the browser where you approved the agent.
- The client name and version the agent reports about itself. The agent supplies these, so treat them as a hint.
- A token identifier that starts with
dt0b06.. Use it to match a token you hold, or one a secret scanner flagged, to its agent.
Bluebox does not show IP addresses.
A connection ends 90 days after you approved it. It also ends if the agent goes 14 days without use. When a connection ends, the agent disappears from the list and has to ask you to approve it again.
To revoke an agent, select Revoke on its row and confirm. The agent stops on its next call and cannot sign itself back in. Your other agents, access tokens, and browser sessions keep working. If you do not recognize an agent, revoke it, then check Browser sessions for sign-ins you do not recognize.
Only you see the agents you approved. Other members of your workspaces, including workspace owners, cannot see or revoke them. An agent acts with your current workspace access, so if a workspace owner changes your role or removes you, the agent's access changes with yours.
Move from an access token to sign-in
A connection you set up with an access token keeps working. Moving it to sign-in is recommended, because no token stays in a config file and you can review and revoke the agent in Account → Connected agents.
- Remove the token from the connection:
-
Claude Code: run the command below, then add the server again as described in Claude Code.
claude mcp remove blueboxIf Claude Code reports that
blueboxexists in more than one scope, run the command once for each scope it lists, for exampleclaude mcp remove bluebox -s localandclaude mcp remove bluebox -s user. -
Claude Desktop: remove the connector, then add it again as described in Claude Desktop. Claude Desktop does not let you edit request headers.
-
Other agents: delete the
Authorizationheader from the connection. For Codex, delete thebearer_token_env_varline. Keep the URL and anyX-Workspace-Idheader.
-
- Start sign-in from the agent, using the sign-in steps for your agent in Connect your agent, and approve access in your browser. Claude Code and Codex do not start sign-in on restart.
- Confirm the agent still answers questions, then revoke the old token in Account → Access tokens.
Cursor starts sign-in even when your config holds a token, so a token-based Cursor connection can open the sign-in page unexpectedly. Moving to sign-in stops that.
Scope to a specific workspace
By default, Bluebox resolves your workspace automatically: first your preferred workspace, then the one you used most recently, then your only workspace if you belong to just one.
To pin a connection to one workspace, send an X-Workspace-Id header with your workspace ID. Workspace IDs start with ws_ and appear in the URL when you are signed in to Bluebox. The setup page adds the header for you when you select a workspace before copying the config. To add it by hand:
| Client | Where to add it |
|---|---|
| Claude Code | Append -H "X-Workspace-Id: <your-workspace-id>" to the claude mcp add command. |
| Claude Desktop | Add a custom request header named X-Workspace-Id when you create the connector. |
| VS Code, Cursor, Kiro, Kiro web, other clients | Add "X-Workspace-Id": "<your-workspace-id>" to the headers object. |
| Codex | Add http_headers = { "X-Workspace-Id" = "<your-workspace-id>" } to the [mcp_servers.bluebox] section. |
A workspace you are not a member of is always refused, whether it was set in your config or mentioned in a question.
Troubleshooting
Bluebox tools do not appear after setup. Restart or reload your agent fully. If the tools still do not appear, verify the endpoint URL is correct and, if you use a token, that the token is correct, and confirm your client is up to date. Bluebox requires a client that supports the MCP HTTP transport; older client versions may need an update before they can connect. Check Account → Access tokens to confirm the token exists and has not been revoked.
The agent does not open a browser to sign in.
Confirm the config has only the URL and no Authorization header, then restart the agent. Some agents wait for you to start sign-in: run /mcp and select Authenticate in Claude Code, or run codex mcp login bluebox for Codex. If your agent does not support MCP sign-in, use an access token.
Codex stops with "Authorization server response missing required issuer".
Your Codex release is too old. Update Codex to 0.148.0 or later, then run codex mcp login bluebox again.
Cursor opens a sign-in page although I use a token. Cursor starts sign-in before it sends the headers in your config. Close the page, or approve it and move to sign-in.
The agent asks me to sign in again. Your connection ended, or you revoked it. Approve it again in the browser page the agent opens. See Review and revoke connected agents for when a connection ends.
The agent is using the wrong workspace.
Your connection is not pinned to a workspace. Re-generate the config from the setup page with your target workspace selected, or add X-Workspace-Id to your config manually, then restart your agent.
"no workspace selected" error.
Your account belongs to more than one workspace and no default is set. Pin the connection to one workspace using X-Workspace-Id, or set a default workspace in workspace settings. See Your default workspace.
"workspace not found or access denied" error.
The workspace named by the agent's workspace_id or your X-Workspace-Id header does not exist, or you are not a member. Remove the header, or ask the agent to call list_workspaces and pick one you belong to. If you belong to none, see If you have no workspace.
"you have no Bluebox workspace yet" error. Your account belongs to no workspace. Create or join one in the web app. See If you have no workspace.
An answer takes a long time or shows "still running." Some questions take longer than a minute to complete. Your agent will poll for the result automatically. Do not ask the same question in the same session while one is in progress; doing so starts a second independent run. Wait for the first answer to arrive, then continue with follow-up questions.
Token is invalid or access is denied. Your token may have been revoked or expired. Go to Account → Access tokens, revoke the old token, and generate a new one. Update your agent's config with the new token and restart.